

UI Series
Setting Up Custom Defaults
Version 2.0, Updated Mar 2024 using Octane 2023.1.2 and Cinema 4D 2024.2
About this Guide
This guide is all about setting up custom defaults so that every time we open a brand new file, we can very quickly dive in and get to work without having to do the same menial tasks each time.
Changes from 1.0: This guide has been rewritten to take into account new features and settings in both C4D and Octane (and new knowledge that finally sunk into the author’s brain).
Part I: Building a C4D layout
Part II: Setting up Octane presets
Part III: Building a default C4D file
Part IV: Troubleshooting and reference
PDF
Downloads
Everything built in this guide (good through Octane 2023.1.2 and C4D 2024.3.1) can be downloaded here.
Intro
Presets are very useful for workflow efficiency and getting a new project up and running fast.
If we’re using the Cinema 4D plugin for Octane, there are three different preset areas to know about and get set up properly, and they should be done in a particular order. This can get a little confusing, so let’s take a look at how it all works.
Octane has its own set of per-project settings in the Octane Settings popup (the gear button). These are things like the selected kernel, number of samples, color management, post effects, default environment color, and stuff like that. These settings are saved in, and travel with each .c4d file. This means if we set the kernel to Photon Tracing, make the max samples 1024, turn on ACES tone mapping, and apply bloom, if we save the file and give it to someone else, they’ll see all these settings when they open the C4D file.
A set of these per-project settings can be saved into an Octane preset. Presets are managed in the Octane Settings popup (gear icon) in the Presets menu. Presets overwrite the current per-project settings when selected. We can reset all of the per-project settings to “factory” defaults by going into the Settings menu in the Octane Settings and hitting Reset.
The actual file on the drive where these presets are stored is called presets.dat and can be found by going into C4D’s preferences (Edit>Preferences), clicking the “Open Preferences Folder” button at the bottom, and then going into the \prefs folder.
There are also global Octane settings that don’t change from project to project. These are settings like the node colors, account settings, file paths, out of core RAM limits, and other things we generally don’t want to tweak too much unless we’re running into problems. They are found in the Octane Settings under the Settings tab.
Global settings live in a file called oct.dat which is also located in the \prefs folder.
Important: There is no easy way to reset the global Octane settings. They do not reset with the “Reset” command. To get the defaults back, we have to shut down C4D (otherwise this won’t work), go in the path above, delete the oct.dat file, and then re-launch C4D. This will not affect the presets (different file).
Cinema 4D also has per-project settings located in Project Settings (Ctl/Cmd-D), Render Settings (Ctl/Cmd-B), and Viewport settings (Shift-V). These settings also get saved in and travel with the .c4d file.
We can set up a Startup Scene which contains all of both the Octane and C4D per-project settings and loads every time we make a new file as kind of a template. This can be set in the C4D Preferences (Edit>Preferences) under the Files section.
C4D also has layouts which control where windows are located and docked, and which tools are in the UI. Layouts are managed in the upper right of the C4D UI and are global (do not travel with C4D files).
In this guide, we’re going to go over all of this and set up some good defaults to make our lives easier.
Part I: Custom C4D Layout

Above, we can see the default layout. It’s pretty good for stock C4D, but can be made quite a bit better for us Octaners. There are several other Layouts at the top set up for things like modeling or UVs, and a little three dot menu at the end that lets us create custom layouts and define one as the Startup Layout. In the first part of this guide, we’re going to build a custom layout for Octane and set it as our Startup Layout.
Important: Layouts are per-install, not per-project. They don’t travel with .c4d files.
Docking the Live Viewer

We’re going to be using the Live Viewer a lot, so it makes sense to dock it in the interface. This is done by grabbing the LV window by the hamburger menu (stacked lines in the upper left corner), and dragging it until a light gray preview bar appears where the window can dock. When we let go, it snaps it into place.
This is going to be largely dependent on the type of scene we’re working on and the aspect ratio of our screens. If we have a single 16x9 panel, docking it to the left or right of the Perspective viewport is usually pretty good for a versatile half render/half viewport type of layout. We’re going to do that in this guide.
If we’re working on a wide cinematic aspect ratio scene, placing it above or below the perspective viewport can be a good strategy. If we have a slower GPU, or only need to see a small render view, the upper right corner above the object manager can be a good place to stash it.
Customizing the Palettes

Next up is adding custom UI buttons, and replacing some of the stock ones in the layout.
Important: The Material Drawer can’t be opened or closed in Customization mode, so we need to make sure it’s open prior to customizing.
Let’s go under the Window menu under Customization, and choose Customize Palettes. This will put the interface into Customization Mode (light gray boxes will appear around everything we can customize), and will also pop up the Command Manager.
Most of the Octane-related commands can be found by typing “Octane” into the Name filter. One notable exception is the HDRI Environment, which needs to be searched for separately by typing “HDRI”.
To add a command/button to the interface, we can just drag it from the command manager into the palette we want it in. To remove a button from the interface, we can double-click it.
In this guide, we’re going to add: Octane Camera, HDRI Environment, Texture Environment and Targeted Area Light. Feel free to add anything else you find yourself using a lot (DayLight rig, Scatter, IES light, etc.)
To clean this bar up, we can also remove all of the Standard and Redshift camera, light, and sky objects that are already in the interface.
In the Material Drawer, let’s drop in the Universal Material command next to the eyedropper so new materials can be made quickly.
When we’re finished, we can just close the Command Manager, and it will get us out of customization mode.
Resizing the Layout
Layouts save the sizing & location of all the UI panels and viewports, so let’s shift them around until it seems about right depending on the size and aspect ratio of our monitors. We also need to decide if we want to start with the material drawer open or closed whenever we open C4D or select our custom layout.

Saving the Layout
When we’re happy with the proportions and UI elements in our layout, we can go to Window>Customization>Save Layout as... and save it in the default location. If we need to reinstall C4D, this is the directory where we’d drop in our custom layouts if you built them previously and saved them elsewhere. It will then appear to the far right in our layout bar in the upper right of the C4D interface.
Important: There have been issues in the past with layouts built in prior versions of C4D causing issues with the current version. It’s good practice to rebuilt a layout from scratch every time a new full year release comes out (2023, 2024, 2025, etc., not necessary for dot releases like 2024.2 or 2024.3)
We can make this layout the default when we launch C4D by going to Window>Customization>Save as Startup Layout.
Each custom layout is saved as two files - an .l4d and a .prf. We can get to those files by going to C4D’s Edit menu > Preferences > Open Preferences Folder and going into the C4D folder > library > layout.
Part II: Setting Custom Octane Presets
Having a good set of Octane Settings presets for various project types will help the iteration speed of our renders quite a bit. All of the preset management is located in the Presets menu of the Octane settings (gear button on the Live Viewer).
When a preset is loaded (selected from the Presets menu), it does a one-time overwrite of the current per-project Octane settings. If a setting is altered after the preset is loaded (say, Max Samples is doubled or something), that settings will be wiped out and replaced if we load our preset again.
Octane presets save ALMOST EVERYTHING in the Octane settings window. There are some global settings in the Settings tab that we’ll explore later, but everything else can be saved in a preset.
In this section, we’re going to create a preset called LookDev 2023 (development of the look of a render). In many cases, this is all that’ll be needed - a good foundation of settings that can be further altered per project as it evolves and has specific needs or gets closer to the final render.
Kernels Tab

That gray bar at the top that defaults to “Direct Lighting” is a dropdown. There are some settings we’ll need to change for specific kernels, and some that apply to all three. Whatever kernel we end up on when we save our preset will be the one we default to, so we’ll probably want either DL or PT for this.
Direct Lighting (DL) Settings:
• Glossy Depth goes to 5 to be in line with the recommendations of Octane Standalone - 2 is too low and will black out reflections quickly. Diffuse depth is fine at 2 unless we want to use GI_DIFFUSE, in which case 4 or 5 is probably a better starting point.
• Parallel Samples should be set to 32 UNLESS you have a GPU with 6GB of VRAM or less or tend to work on scenes that are very VRAM-intensive (tons of textures or geometry).
• Adaptive Sampling should be ON, and the threshold should be set to 0.02 to be like Standalone. Expected Exposure should be 0.
Path Tracing (PT) and Photon Tracing Settings:
• Set the Max Samples to 256. This is enough to see results without needlessly running the GPU.
• Leave the GI Clamp at 1,000,000 - only lower it if you’re running into fireflies that can’t be resolved.
• Parallel samples to 32 (same caveat as above).
• Adaptive Sampling ON, Noise threshold at 0.02, Expected Exposure at 0.
Color Management / Tone Mapping

Color Management is a thing. It’s a complex and widely misunderstood topic. Two entire guides (Color Spaces Overview and Octane-specific) have been written about it so far, with probably more to come. That said, when we’re setting up defaults, we’re mostly concerned with Tone Mapping, which is how color is handled when moving from a much larger amount of data than our screens can display to a smaller amount that they can.
As of this writing, ACES Tone Mapping is simple and easy to set up, and what we should probably be using if we’re just starting out. It will shift some of our input colors (so if exact corporate colors are necessary, we’ll actually want this OFF), but it’ll handle blown highlights and other artifacts a lot better than the standard non-tonemapped method that Octane uses by default. This is easy - we just go into the Imager tab and check the box that says ACES tone mapping. That’s not kernel-dependent, so we only have to do it once, and then it’ll always be on when we save our preset.
If we’re using AgX or some other type of OCIO tone mapping, we need to make sure that we have our OCIO config profile loaded properly in Settings>Color mgmt, and then in Imager>OCIO, set the OCIO view and look appropriately. This is all covered in detail in the Octane-specific color management guide.
Default Environment

Octane needs an environment to render. If we don’t have one in the scene (HDRI, Texture, etc.), it reverts back to the Default Environment located in Settings>Env. This comes standard as 90% white, which means if we’re trying to light a scene with just Emissive materials or Area Lights, the whole thing will wash out because of the environment. Most of the time we want the default environment to be set to black so it doesn’t do this. This is the only per-project setting in the Settings tab and it saves in our preset.
Octane Live Viewer Settings

The most important setting here that is saved in a preset is the Lock Resolution toggle. This shows us our scene at 1:1 resolution (1280 pixels across by 1280 down) without scaling, and also only renders the pixels that will show in our final frame. It’s highly recommended to keep this ON so we can get a good sense of how long our renders will take and what the composition looks like.
If we’re using AgX or other OCIO color settings, we want to make sure the Color Space selector is set to the proper OCIO config. For ACES, just leave it at HDR/sRGB.
Global Octane Settings
Almost everything in the Settings tab is global. Global settings do not change per-project.
Important: Be CAREFUL in here. There’s no easy way to reset global settings. Fear not, though, all of the defaults and instructions on how to reset them are located in the troubleshooting section of this guide.

Fortunately we don’t really need to mess with the Settings tab much. There’s only one important thing we need to change: The color picker. Octane has a native color picker that’s linear RGB… this doesn’t really make a lot of sense to artists coming from 2D apps where we’re used to a nonlinear color picker with a few different models (HSV or hex or 0-255 sRGB). Fortunately we can change this to C4D-native which does give us all those options we’re used to.
Live Viewer Global Settings

The info overlay state in the Live Viewer is a Global setting, meaning it will keep the state regardless of bouncing back and forth between files or changing presets. We can click somewhere in the Live Viewer to toggle these modes. This is a personal preference. If we’re after a clean interface or the overlays get in the way, we can go Minimal. If we care about VRAM but not GPU usage and temps, we can choose Medium, and if we want all the info we can get, we can go Full.
Important - Focus Picker and Material Picker must be OFF, and the render can NOT be paused in order to toggle between Info Overlay states.
If we’re really crunched for space or want to be super minimal, we can right click in the Live Viewer and choose “Toggle Info”. This will turn ALL of it off, including the rendering status and samples at the bottom.
Saving Presets
Important: Whatever kernel we have selected when we add a new preset will be our new default kernel, so we’ll probably want to make sure that’s either set to Direct Light or Path Tracing.
Once we’re happy with a set of options, we can go into the Presets menu in the Octane Settings window and choose Add new preset. If we want to replace a preset, make the preset we want to replace active FIRST, then make alterations, and then in the Presets menu, choose Replace selected preset. If we make a bunch of edits, then activate the preset, it will overwrite everything we just did.
There’s no concept of importing/exporting individual presets, but there is a presets.dat file that contains all the presets we made that we can move over to a new C4D installation. To access that, we can go to C4D’s main Edit menu, choose Preferences, and at the bottom hit the Open Preferences button. presets.dat is located in the /prefs/ subfolder.
Part III: Building a Default C4D File
Now that the layout and Octane presets are squared away, it’s time to build a starter c4d scene that pops up every time we make a new file. Like the layout and settings, this starter scene should contain things that we use on the daily.
Important: The default C4D file does NOT contain the layout - that’s completely controlled by C4D’s Layouts area in the UI. It DOES contain whatever the current Octane settings are, so we want to make sure we have our LookDev preset active before saving the final version of this file. The preset itself does NOT travel with the file, just the current settings.
Setting up the file
Let’s build a new C4D file and save it somewhere.
As of more recent versions of C4D (2023 or 2024 at some point), this process got a LOT easier and more straightforward. We can now name our starter file whatever we want (previously it had to be called new.c4d), and we can put it anywhere we want, including in a synced cloud storage account which is great for using it across multiple installations and machines. It’s also much easier to work on now since we don’t have to worry about permissions and editing files in restricted locations.
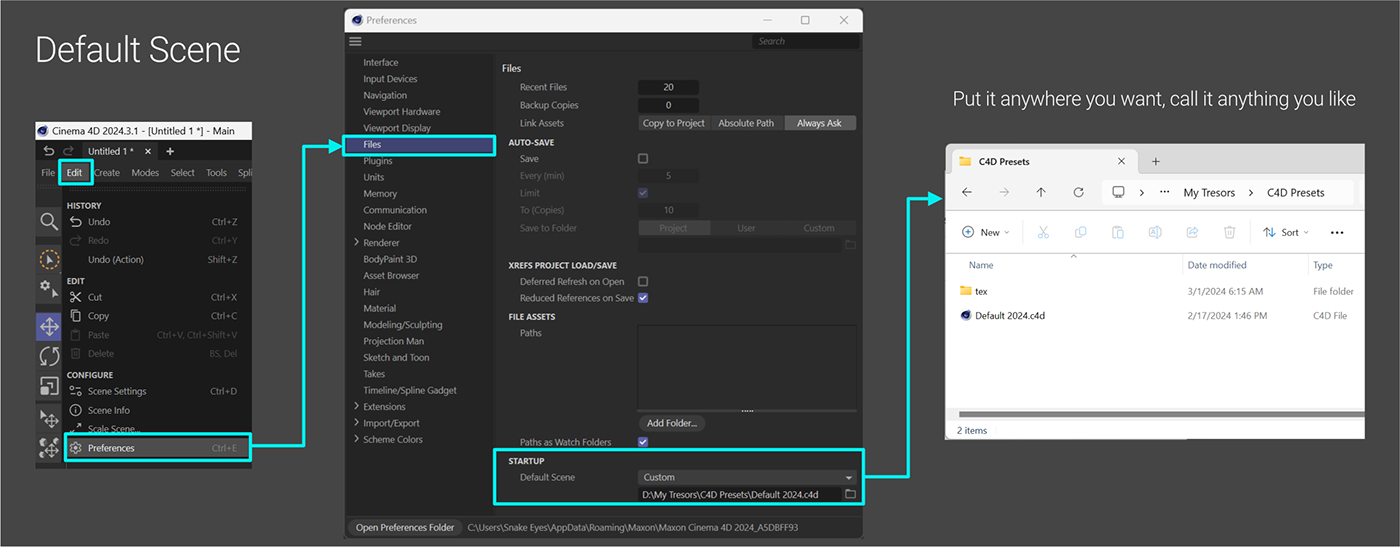
All we need to do now is put our file (and a tex folder if we want external textures) in some location somewhere, then go into Edit>Preferences, go to the Files section, scroll to the bottom, set Default Scene to Custom, and then find the file we just created.
That’s it! Every new C4D project we create will be based on that file.
C4D Render Settings
C4D Render settings travel with the C4D file, so we want to make sure we set this up properly.
Let’s hit Ctl (or Cmd)-B to open up the Render Settings.
In the Output section, let’s set our scene size. We’re going to use 1280x1280 here because square is a good starter aspect ratio, it fits nicely with our side-by-side layout, and it’s low enough resolution that it should render most things pretty fast. Depending on your monitor, GPU, and what kinds of scenes you normally work on, you may want a different starter resolution.

Next we’ll want to set Octane as the render engine by changing the Renderer dropdown to Octane Renderer. This isn’t strictly necessary, especially if we’re saving files directly from the Live Viewer, but it’s helpful if we’re doing AOVs or want to save from the Picture Viewer for some reason.
Once we do that, an Octane Renderer section will appear on the left. The only thing we’ll want to do here is turn on Use denoised beauty pass.
Default Objects
Next up we’ll want a few default objects in our scene. Odds are good we’re usually going to want an environment and a camera at least, and possibly a default object just to get a sense of scale.
Let’s use our new Layout and hit the Octane Camera, HDRI Environment and Texture Environment Buttons that we docked. Let’s name this null “Enviro” (or “Environment” or Scene” or whatever makes sense to you), and name the HDRI environment “OctaneSky - HDRI”, and the Texture environment “OctaneSky - Visible”. That way we’ll know which is controlling the HDRI and which is controlling the background. We can gather all those up and put them in a null by selecting all three and hitting Alt-G (Opt-G on a Mac).
Important: Alt-G will take the average Position/Scale/Rotation values of all the objects and place the null at those coordinates. We DO NOT WANT THIS. Our Environment null should always be at World Zero, so let’s select the Enviro null and hit Alt-0 (alt-zero) to zero out all the coordinates.
Just to make it easier to find, if we click our Enviro null, go into the Basic tab, and roll down the Icon section, we can set the Icon Color to Custom. This will make it yellow (we can change that if we want).

We’ll notice that when we drop in the Texture environment, it lights up the perspective viewport white. This is annoying - it makes finding our objects and reading the UI harder. The quickest way to fix that is to hide our Enviro null from the Viewport (not the render!) by setting the top traffic light to red. We need to make sure to leave the bottom one gray or else nothing in that null will render or affect the scene.
HDRI Setup
Let’s get a default HDRI into our HDRI environment. C4D has a lot of custom HDRIs in the Asset Browser drawer on the left (closed by default).

First let’s click the HDRI Environment’s TAG (not the sky object). Next - and this is really important - we need to click the ImageTexture Bar. NOT the dropdown arrow to the left, NOT the folder icon to the right. The bar itself. That will open the Image Texture shader that’s specifically set up for an HDRI. If we replace the ImageTexture, all hell will break loose and your scene will blow up into a million pieces and take down your computer.…
Ok, maybe that was a little dramatic, but it will have a negative impact on the scene.
Once we’re in the Image Texture node, we can open up the Asset Browser by clicking the icon in the top left next to the X Y and Z filters that looks like a file cabinet drawer. If we type HDRI into the search field, we can find all of C4D’s built-in HDRIs. If we scroll down, there are a bunch of black and white studio setups - any of those will work. Let’s drag one into the File Field. The nice part about this is that we don’t have to store the HDRI separately and it will work in any install of C4D.
Texture Environment Setup
Now let’s get a nicer backdrop going. We probably don’t want to see the HDRI, and black is a little harsh, so let’s use our Texture environment as a backdrop.

Let’s click our Texture Environment’s (OctaneSky - Visible) Environment Tag. Again, not the Octane Sky object, the tag itself. This setup is a lot easier - we just need to click the white square under RgbSpectrum and change it to a dark gray - H:0, S:0, V:15 works pretty well. Then we need to change the Type to Visible Environment - that will tell Octane to use this as the backplate. The HDRI is already set to Primary Environment which allows it to control the lighting.
Default Object and Camera
Now that our lighting is set, we want to get the camera set up and get an object in the scene for scale. Cinema 4D’s default primitives are HUGE. The sphere is larger than an average person, which is great for some abstract street sculpture, but not great for items on a table. When we’re working in Octane (or any physically based engine), we want our objects to be real world scale. All of the lights and render settings and calculations will just work better this way. Having the default objects be so large can steer us toward making 7 foot tall basketballs rather than 7 foot tall basketball players.
Let’s drop in a sphere and make it 10cm. That’s about the size of a soccer ball (football), or a human head. Another good strategy would be to use a C4D figure, since that would pretty much guarantee we start working at human scale for things, but the sphere is cleaner, so we’re going to go with that for now. Speaking of ‘cleaner’, the default sphere has 32 segments. Let’s up this to 100 to make it smoother.
Newer versions of Cinema 4D (even standalone C4D subs) have a capsule called Geometry Axis. This is handy for putting our sphere on the “floor”. Let’s hit Shift-C and search for Geometry Axis, double-click it to add it to our scene, and then nest that under the sphere and set Axis Y to 100%.
Finally, we need a quick material to catch the HDRI lighting. Let’s open the Material drawer and use our new Universal Material button to make a new one, and then apply it to the sphere. Defaults are fine.
Important: There’s a bug that happens in C4D sometimes where a new material doesn’t show up after creation. If we click in the Material Manager window (where it should show up), it’ll magically appear.

Picking a focal length for a lens (or camera, since C4D doesn’t really differentiate) should be a conscious choice in every scene.
Cinema 4D’s camera defaults to 35mm. As any photographer (aside from maybe a street photographer) can tell you, 35mm is one of the more difficult focal lengths to work with. It sits in this awkward position between being a “wide angle” lens (~18-24mm) which is used for landscapes and big, epic compositions, and a “normal” lens (~50mm) which is close to how a human eye actually sees.
We should be starting with a focal length that works similarly to how we see (50mm) and then consciously choose to alter it depending on our subject matter. Let’s click the C4D Camera Object (not the Octane Camera tag), go to the Object tab and set the focal length (not the sensor size) to 50mm. Just so we remember, let’s rename our Camera object to OctaneCamera - 50mm.
Let’s click the little reticle just to the left of the Octane Camera Tag (the crosshairs thing) to turn it white so we know we’re looking through that camera.
Now let’s get a basic framing down. While it’s often a good idea in a scene to start off with the camera at eye level (~160-180cm off the ground), our sphere is pretty small, so it would look like we’re towering over it. Let’s set the camera up so we’re right in front of it looking down on it a bit. Standing in the middle of the world, but back a bit (Position.X = 0, Position.Z = some negative number), and looking directly “back” into space (Rotation.P = 0) is a good way to audition different HDRIs to test out lighting scenarios without fiddling with rotating them.
We can do all this by setting the Camera object’s coordinates to P.X: 0, P.Y: 50, P.Z: -50, and R.P: 0, R.H: -38.5, R:B: 0, and leaving the Scale values alone.
If we haven’t been saving our scene, we should do that now.
Final Cleanup
There are a few more settings that travel with the C4D file that aren’t part of any presets we’ve set up so far. Let’s get those settled and then we can call this process done.
Viewport Settings
C4D’s perspective viewport starts out with a number of ‘helper’ overlays that may or may not be all that helpful. There are a few things we can turn off to declutter it.

If we make sure the perspective viewport is active and hit Shift-V, we’ll get the viewport options up. The Filter tab shows what appears in the viewport. To get the scene as clean as possible, we can turn off Workplane (the grid), World Axis (the big red/green/blue axis thing in the middle of the scene), and Horizon (the single pixel horizontal line that shows the horizon.
As we put more stuff in the scene, we’ll get a sense of where the floor and horizon are, and there’s still a small axis in the upper right of the viewport to help us get oriented. If we’re doing a lot of heavy modeling, we might want to turn the workplane back on to help us snap things together, but for general scene composition, it can get in the way.
If we go to the HUD tab, we can turn off View Transform (C4D/RS color management which isn’t relevant to Octane), Active Tool (sometimes gets in the way), and Grid Spacing (we’re working in real world scale, don’t need this unless we’re modeling).
We should also decide whether we want to start in single view (perspective viewport only) or 4-view mode (Perspective/Front/Top/Side). That option gets saved with (and travels with) the file. If we want 4-view, we can frame up the sphere in all the other views by rolling over each one and hitting H.
This ultimately is going to be a matter of taste and comfort level. You may want more or fewer things in the viewport as your 3D journey progresses, but what’s there should always be intentional and serve a purpose.
Part IV: Troubleshooting / Reference
The main thing to remember is that every time a new full version of Cinema 4D comes out (full years like 2023, 2024, 2025, etc, not dot releases like 2024.2 or 2024.3.1), it’s a good idea to do this whole process over again - set up new layouts, default files and Octane presets from scratch. It’s also worth revisiting the settings any time a new full year version of Octane comes out.
There have been cases where crashes and instability have occurred when using a layout built in an older version of C4D, which is why it’s always good to rebuild it yourself from scratch.
Where the files are

Most of the preference files for C4D and Octane are located in the Users folder, in a folder with the current version of C4D. This can quickly be located by going to Edit>Preferences in the C4D main menu and hitting the Open Preferences button.
Windows: C:\Users\*USERNAME*\AppData\Roaming\Maxon\Maxon Cinema 4D 2024_********\
Mac: Macintosh HD/Users/*USERNAME*/Library/Preferences/Maxon/Maxon Cinema 4D 2024_********/
/prefs/oct.dat contains the global Octane preferences.
/prefs/presets.dat contains all the custom Octane per-project preset sets that we created.
/library/layout/whateverwecalledit.l4d & .prf is our custom layout.
Resetting Octane’s per-project settings
This can be done pretty easily from the Octane Settings window (gear button). All we need to do is go to the Settings Menu and choose Reset. This will populate all of the per-project settings with the defaults. It will NOT touch the global settings found in the Settings tab.
These will be overridden if we either make a new file using a custom C4D startup file that we created with different settings, or if we choose an Octane preset, so we’ll want to wipe all of those out prior to rebuilding them.
Resetting Octane’s global settings
This is more involved. There’s no easy reset for this, so if we want to get back to defaults, we have to open that prefs folder, CLOSE C4D (otherwise Octane will just rebuild the file as soon as we delete it), delete oct.dat from the /prefs/ subfolder, and then launch C4D again.
That, or we can compare against the following screenshots for Octane 2023.1.2

Wrap Up
This should get you on your way toward working with Octane in C4D more efficiently. If you have any tips or comments, feel free to leave them in the comments section.
Author Notes
OG024 Custom Defaults Version 2.0, Updated Mar 2024 using Octane 2023.1.2 and Cinema 4D 2024.3.1
Changes from 1.0: Full rewrite
This guide originally appeared on https://be.net/scottbenson and https://help.otoy.com/hc/en-us/articles/212549326-OctaneRender-for-CINEMA-4D-Cheatsheet
All rights reserved.
The written guide may be distributed freely and can be used for personal or professional training, but not modified or sold. The assets distributed within this guide are either generated specifically for this guide and released as cc0, or sourced from cc0 sites, so they may be used for any reason, personal or commercial.


